
I have had this issue come up a few times. I had the need to setup an employee’s laptop with access to an Exchange 2013 mailbox. However, the employee was using a laptop that was not a domain member and could not use autodiscover to automate Outlook setup.
In Exchange 2010 and earlier, one could just manually configure the Exchange account with a server name of the Exchange server i.e. mail.company.com.
In Exchange 2013, the Exchange server name now uses the format of GUID@company.com where GUID is the Mailbox guid and is unique to each user. That basically means that end users now need a specific value in the server field that is provided by an Exchange administrator.
So the 1st thing we need is the GUID for the account mailbox. Use the Exchange Powershell get-mailbox cmdlet to get the information.
Get-Mailbox | fl name, exchangeguid
You should get something like the following:
Name         : Clark Kent
ExchangeGuid : 39f83854-18b3-4bb2-baf1-9cc03c721c6b
Now go to the client’s system. We need to create a new account either by running Outlook for the 1st time or in the “Account Settings” window. You can get to this windows through Outlook from TOOLS -> ACCOUNT SETTINGS or from the CONTROL PANEL -> MAIL -> EMAIL ACCOUNTS.
Note that the labels vary slightly from outlook 2007 to 2010 to 2013, but the steps are essentially the same.
1. Click NEW to add a new account.
2. Select Microsoft Exchange. Click Next.
3. In the Account Setup section, Check the option to “Manually configure server settings” and click Next.
4. From the E-Mail service window, select Microsoft Exchange and Click Next.
5. In the Exchange Server Field enter the GUID@company.com using the GUID returned from the Get-Mailbox Cmdlet and the mailbox domain (i.e. company.com).
6. In the Username Field enter the user email address (i.e. clark.kent@company.com).
7. Click the “More Settings” button. Select the Connection Tab, check the “Connect to Microsoft Exchange using HTTP” and click the “Exchange Proxy Settings” Button (See image for reference)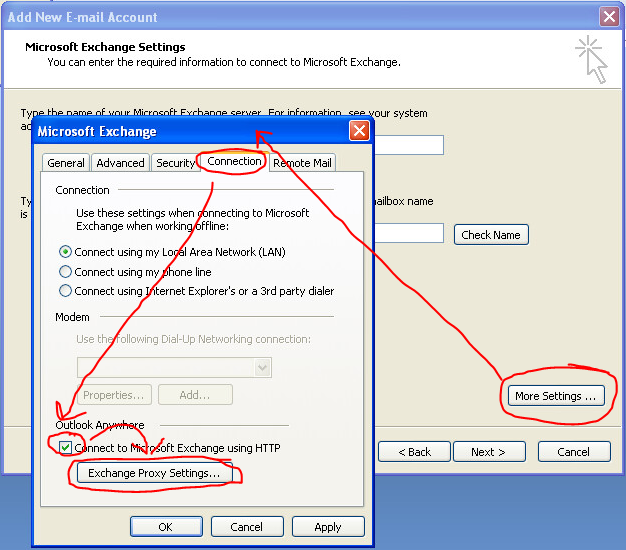
8. In the Proxy Settings Window, enter the mailserver CAS host’s FQDN in the Proxy server field.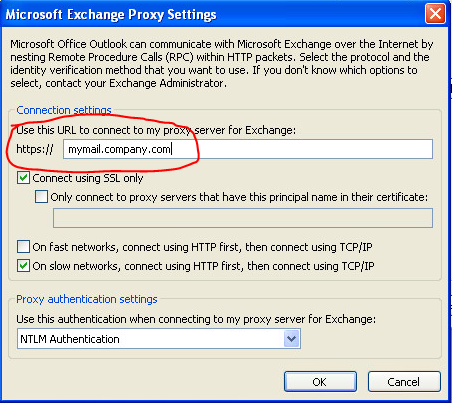
9. Click OK to apply the changes and NEXT to Finish the setup.
That should get the client connected to the Exchange 2013 mailbox.
I honestly don’t see how this is an improvement over Exchange 2010 where all users could be given a simple set of instructions and could setup their own mailbox if autodiscover didn’t work for them. 2013 requires Administrator Support for each user that needs a manual setup since users can’t run the Exchange Cmdlet needed to get the GUID. And before anyone says “Why don’t you just use Autodiscover”, there are times in the real world when you can’t use it. Not every Domain is run like it would be in an enclosed lab.
If someone knows why this is better, please leave a comment and enlighten me.

I dont see any improvement eather.
But, maybe the simpler method is to add a line to %systemroot%\system32\drivers\etc\hosts file with autodiscover.company.com
and then setup Outlook “automatic” way.
When Outlook setup is finished, you can remove the line from the hosts file.
Or you can add the autodiscover host record to active directory. These are both easier approaches.