How To Install VMWare Tools v4 on Ubuntu
Tested With: Ubuntu 12.04 LTS Server, Ubuntu 11.10 Server
All the guides I found on the Internet, including VMWare’s website were outdated in some way, so I decided to write a guide of my own. I just went through these steps from start to finish on a fresh server and had no problems.
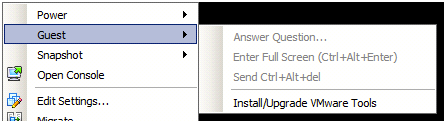
1. Use Install VMWare Tools option in VMWare Client to attach media
2. Update the server
apt-get update
apt-get upgrade
3. Create the mount point
sudo mkdir -p /media/cdrom
4. Mount the ISO
sudo mount /dev/cdrom /media/cdrom
You should see the message: mount: block device /dev/sr0 is write-protected, mounting read-only
5. Change Directory
cd /media/cdrom
6. Copy the tar file to your /tmp directory
sudo cp VM*.tar.gz /tmp
7. Install Build tools if necessary
sudo apt-get install linux-headers-server build-essential
8. Change Directory
cd /tmp
9. Unmount the ISO
sudo umount /media/cdrom
10. Expand the tar
sudo tar xzvf VM*.tar.gz
11. Change Directory
cd vmware-tools-distrib
12. (Only for Ubuntu 11.x) To prevent a potential error in the install script on Ubuntu 11.10, create a special directory.
Error: Unable to create symlink “/usr/lib64/libvmcf.so” pointing to file ”/usr/lib/vmware-tools/lib64/libvmcf.so/libvmcf.so”.
sudo mkdir /usr/lib64
13. Run the Install Script. The -d flag automatically answers the default to all questions. To customize it, just omit the -d.
sudo ./vmware-install.pl -d
14. Reboot
sudo reboot